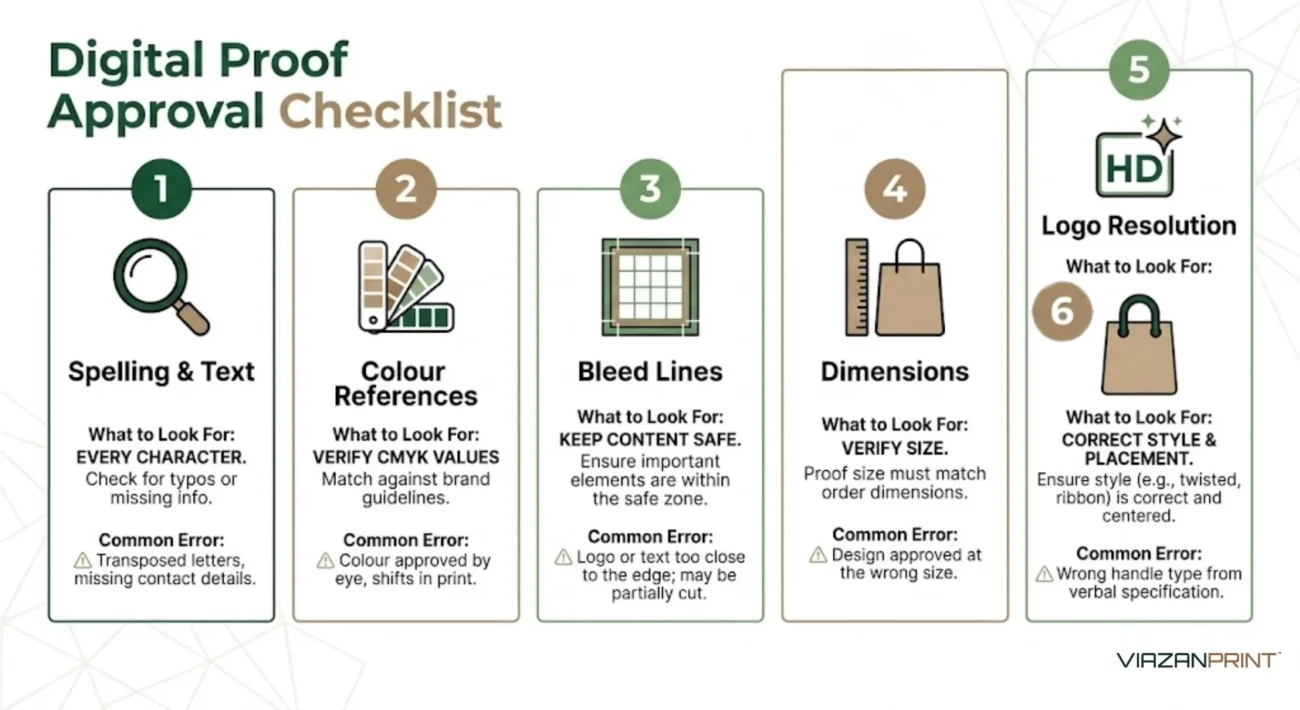
What You Should Confirm to Guarantee Quality Accuracy
The most expensive moment in custom bag printing is not when you pay the invoice. It is when 1,000 bags arrive at your door with the wrong shade of blue, a spelling error on the logo, or handles that snap under the weight of your products. By that point, there is nothing you can do.
The entire batch is unusable, your launch timeline is at risk, and you are starting from scratch.
Custom bulk print orders are produced to your exact specification. If the specification is wrong, the supplier is not at fault for following your brief. The financial and operational loss falls entirely on the buyer.
The good news is that most bulk printing mistakes are preventable. They almost always happen at the same stage: before production begins. This guide walks you through every critical checkpoint, from reading your digital proof to requesting a physical sample, so you can approve your order with confidence.
Key Takeaways
- Colour on screen is never colour in print. RGB and CMYK have different colour ranges. Always confirm CMYK values or provide a Pantone reference before approving any proof.
- A digital proof confirms the design layout. A physical sample confirms real-world performance. For orders above 1,000 pieces, a physical sample is not optional.
- Artwork quality determines print quality. Submit vector files (AI or EPS) or raster files at a minimum of 300 dpi to avoid pixelated logos on finished bags.
- Unverified verbal details become errors. Handle type, bag dimensions, and print placement must all be confirmed in writing on the digital proof, not just discussed at the quotation stage.
- A supplier's QC process is a concrete thing, not a claim. Before placing any bulk order, ask your supplier to name the specific checks they run before dispatch.
- The sample protects your deadline, not just your quality. A batch rejected after bulk production means restarting the entire order at full cost and lead time.
Why the Colour on Your Screen Is Never the Colour You Will Get (RGB vs. CMYK)
The colour gap between your phone screen and your printed bag is not a quality problem. It is physics.
Screens display colour using RGB (Red, Green, Blue) light, which can produce over 16 million colour combinations, including extremely vivid, bright tones. Commercial printing uses CMYK (Cyan, Magenta, Yellow, Black) ink, which has a smaller colour range.
The result: your vivid screen blue will always appear slightly different on a physical bag, usually a little darker or less saturated.

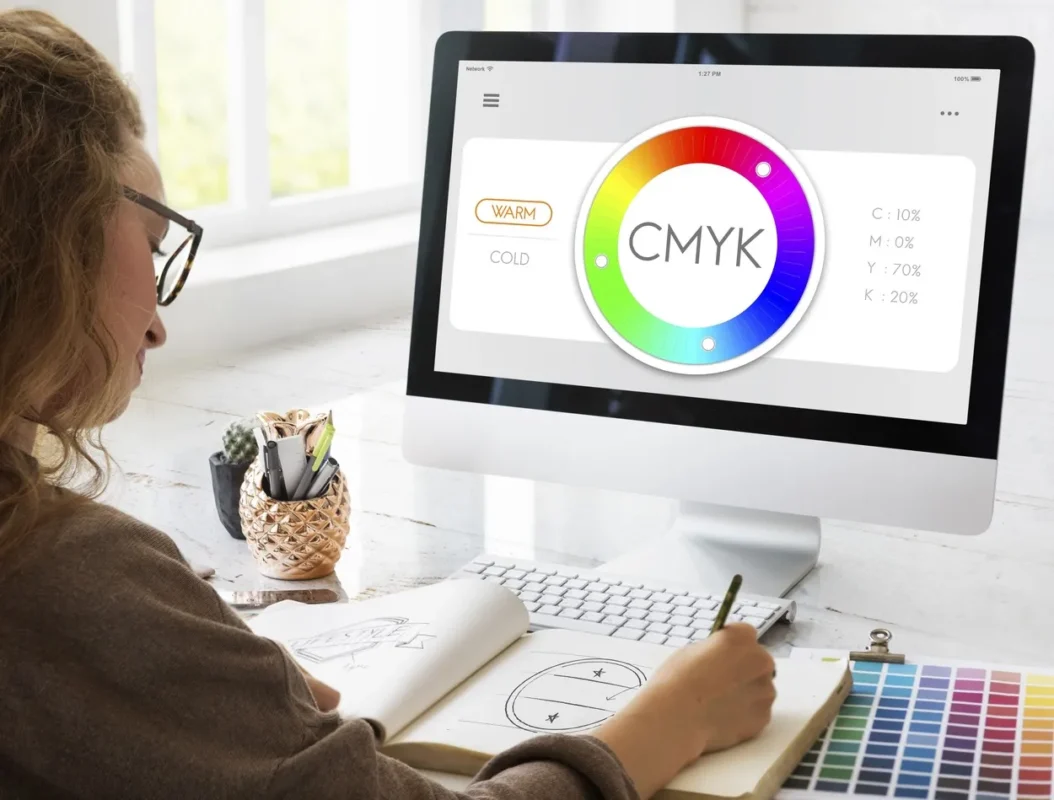
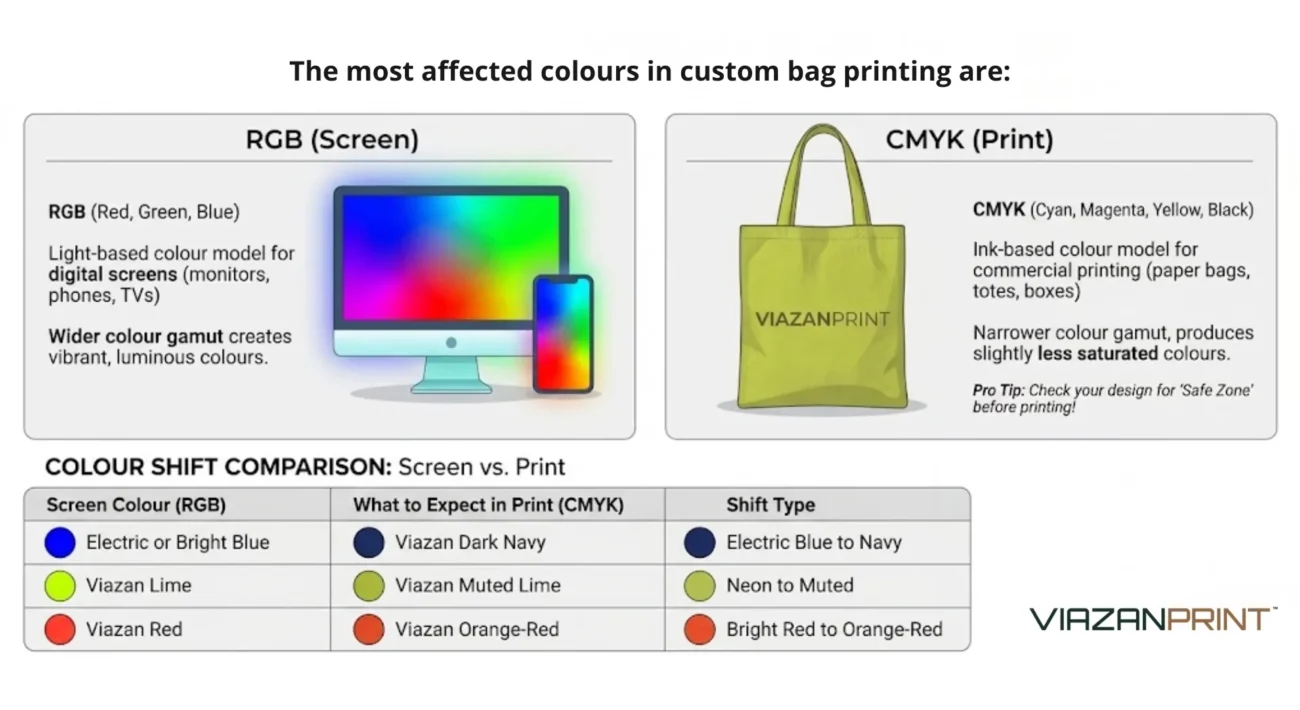
This colour shift is expected and manageable, but only if you know how to handle it. Pantone Matching System (PMS) references eliminate colour guesswork entirely.
Pantone assigns a numeric code to thousands of exact colour formulations, so the printer mixes ink to match that specific code rather than approximating from a screen colour. If you do not know your brand’s Pantone reference, check your brand guidelines or ask your graphic designer.
The device you use to review the proof also matters. A proof that looks correct on a calibrated monitor will appear different on a phone or older laptop, so always request the CMYK values alongside the visual proof and check the numbers, not just the appearance.
Before approving any colour, ask your supplier whether the file has been converted from RGB to CMYK, what CMYK equivalent they are using for any Pantone references, and whether any colours that shift significantly have been flagged.
Viazan Print’s pre-production process includes a standard CMYK conversion check, with any significant shifts flagged to the buyer before production begins.
How to Read a Digital Proof: A 6-Point Checklist Before You Sign Off
Most buyers receive a digital proof, glance at it to check the logo looks roughly right, and click approve.
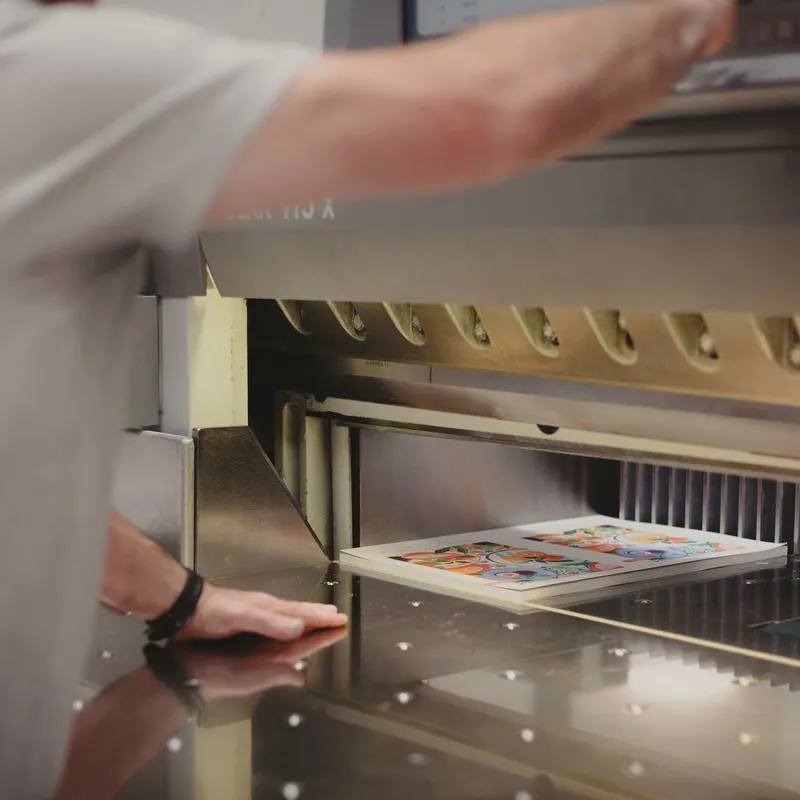
Two minutes of systematic checking at this stage protects you from the most common bulk printing mistakes, so before approving any proof for a paper bag or non-woven bag order, work through these six checks in order.
1. Spelling and text accuracy: Check every word, including your own business name
Read every piece of text on the proof character by character: business name, tagline, contact details, website, and any copy on the bag. Do not skim. Text errors cannot be partially corrected; the entire print run must be redone, and the supplier is not responsible for approving errors in buyer-supplied artwork.
2. Colour references: Confirm CMYK values match your brand specification
Locate the CMYK colour values for each colour in your design and compare against your brand guidelines or Pantone reference. Do not rely on how the colour looks on your screen. If the proof does not include CMYK values, request them explicitly before approving.
3. Bleed lines: Check that design elements do not extend beyond the safe zone
Commercial printing requires a “bleed,” which is a small margin (typically 3mm) of artwork that extends beyond the final cut line. On a digital proof, the safe zone is usually indicated by a dotted inner border. Nothing critical, including text, logo, or key graphics, should sit outside this border.
4. Dimensions and orientation: Verify the proof matches the bag size you ordered
Confirm the proof specifies the correct bag dimensions (width × height × gusset) and that the design is oriented correctly. For bags with printing on both sides, verify both sides are present and correctly oriented relative to each other.
5. Logo resolution: Confirm the logo is sharp at print size, not pixelated
Zoom to 100% and check that your logo appears crisp and sharp. A logo that looks fine at thumbnail size on screen may print with visible pixelation at full bag size. Ideally, your logo should be a vector file (AI, EPS, or SVG) that scales to any size without loss of quality.
6. Handle type and placement: Confirm the handle style matches your order
For paper bags, confirm the proof shows the correct handle type (ribbon, twisted paper rope, flat, die-cut) and that handle placement is centred and proportional to the bag size. Handle type is often discussed verbally at the quotation stage and then not checked again at the proof stage.

Viazan Print includes a pre-production artwork check as standard. The team reviews submitted files for resolution, colour mode, and bleed before sending the digital proof, so any flagged issues are communicated before the proof reaches you.
How to Check Quality Before Approving Bulk Production: Viazan's 3-Point QC Framework
Once a physical sample is approved and bulk production begins, your role in the QC process is largely complete. Viazan's is not. Before any bulk order is packed and dispatched, Viazan's production team runs a three-point quality check on the finished product to catch any issues before the order reaches you.
Checkpoint 1: Artwork Alignment: Is the print positioned correctly on every bag?
The first quality check confirms that the printed artwork sits in the correct position on the finished bag: centred, at the correct height from the base and handles, and consistent across the batch. In commercial printing, small misalignments can accumulate across a run, meaning an artwork that starts centred may drift by 800 if sheet feeding is not monitored. Viazan's QC team checks alignment on sampled units throughout the batch, not just on the first and last pieces.
Checkpoint 2: Ink Curing: Is the print fully dried and rub-resistant?
Ink that is not fully cured will smear or transfer when rubbed against another surface, a problem that surfaces when bags are stacked in storage or when a customer's hand rubs across the logo. Viazan's production team performs a rub test on sampled bags from every batch before dispatch. Any batch that shows ink transfer is held for re-curing or flagged for review before shipping.
Checkpoint 3: Handle Tension: Will the handles hold under realistic load?
For paper bags with attached handles, the QC team applies a standard load to confirm that the handle attachment points hold without tearing or detaching. For non-woven bags, the stitching at the handle base is inspected for consistency and completeness.
Handling failure in the field is a visible brand moment, and a proper QC process should prevent it entirely.
Pre-Bulk Approval Quality Table
QC Checkpoint | Why It Matters | What Viazan Checks |
Artwork Alignment | Misalignment accumulates across a print run | Sampled units across the batch, not just first and last |
Ink Curing | Uncured ink transfers, smears, or fades | Rub test on sampled batch units before dispatch |
Handle Tension | Handling failure in the field is a brand-visible defect | Load test on the handle attachment points before packing |
Every supplier claims quality. Very few name their QC steps. The 3-point framework is named, specific, and applied to every bulk order, because "we have high quality" is not a process, and a process is what protects your order.
Understanding the QC process protects you from most bulk printing mistakes. But it helps to know which specific mistakes are most common, because avoiding them starts before the proof stage even begins.
The 6 Most Common Custom Bag Printing Mistakes (And How to Prevent Each One)
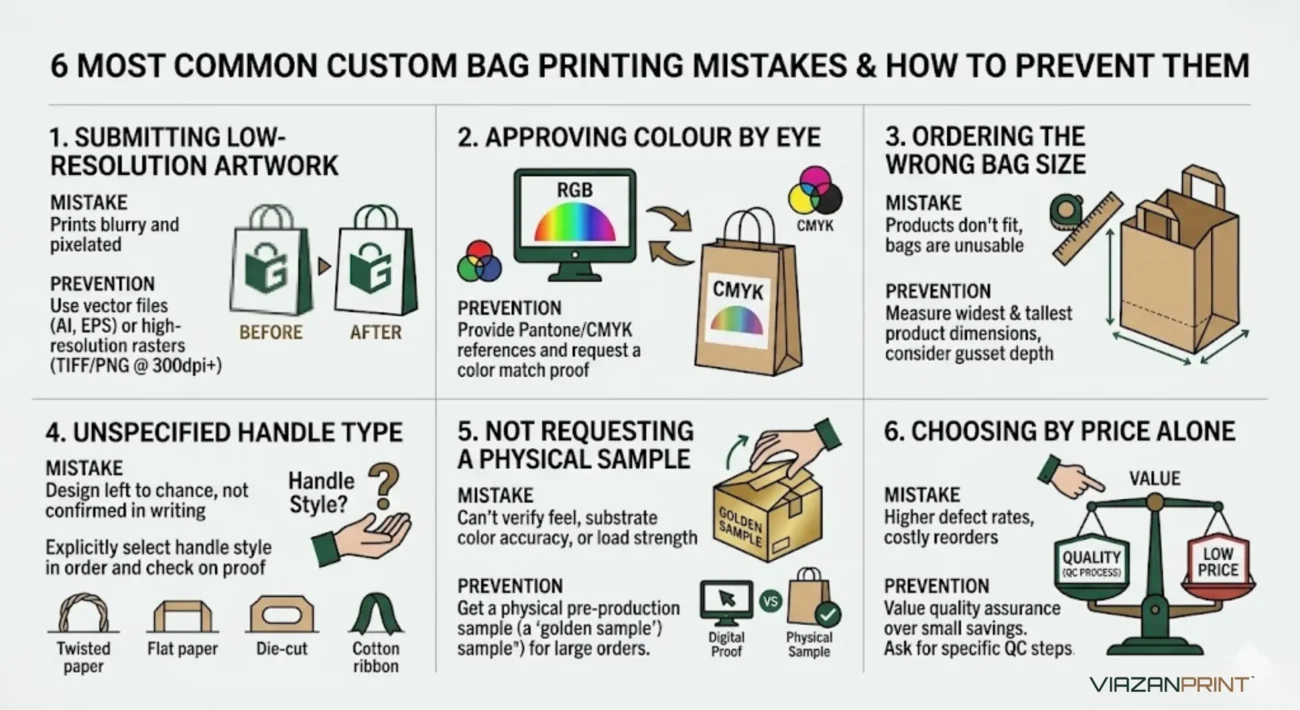
Most bulk printing mistakes are not random. They cluster around the same six decision points. Knowing where the risk sits before you start the ordering process is the difference between a smooth launch and a costly redo.
Mistake 1: Submitting a low-resolution logo file
A JPEG or PNG logo at screen resolution (72 dpi) will appear sharp on a phone but pixelated when printed at full bag size. The minimum for commercial print is 300 dpi at the final print size; vector files (AI, EPS, SVG) are ideal because they scale without loss of quality.
Always ask your designer for a vector file or a 300 dpi CMYK TIFF/PNG before sending artwork to a printer. Viazan checks file resolution as part of the pre-production artwork review and flags low-resolution files before proof production.
Mistake 2: Approving colour by eye on a screen
Screen colours (RGB) differ from printed colours (CMYK). Approving a proof based solely on how the colour looks on your phone, without checking the CMYK values or requesting a Pantone match, guarantees a colour gap between expectations and the physical product.
Always request CMYK values in the proof, provide a Pantone reference for brand-critical colours, and approve colour on a physical sample for large orders.
Mistake 3: Ordering the wrong bag size for the intended contents
A common error for F&B buyers is ordering a bag without first measuring the product dimensions. A bag that is too narrow for a takeaway box or too shallow for a bottled product is effectively unusable, regardless of print quality.
Measure the widest and tallest dimensions of your intended contents before specifying bag dimensions, and include the gusset depth in the F&B order calculation. Viazan offers 7 standard paper bag sizes and custom sizing from a 1,000-piece MOQ.
Mistake 4: Not specifying the handle type in the order brief
Handle type (twisted rope, ribbon, flat paper, die-cut) is often discussed verbally at the quotation stage and then omitted from the formal brief or purchase order. The supplier defaults to a standard handle type that may not match your expectations.
Include the handle type explicitly in your written order brief and confirm it again on the digital proof.
Mistake 5: Approving production without a printed sample for a large order
Digital proofs cannot confirm the material feel, the true ink colour on the physical substrate, or the handle performance under load. Note that kraft paper absorbs ink differently from white stock, so a white logo proof will look different on natural brown kraft without a sample to verify first.
For orders of 1,000 pieces or more, load the sample with the heaviest item it will carry, confirm that the ink does not rub off, and release bulk production only after you have signed off in writing.
Mistake 6: Choosing a supplier based on price alone without asking about their QC process
The lowest per-unit price often reflects a lower-cost production process, which typically means less rigorous pre-production checking. Before placing any bulk order, ask the supplier: “Can you walk me through your pre-production QC process?” and “What happens if a quality issue is found after bulk production?”
A supplier who cannot answer specifically is operating without a documented standard, and the bag that costs 10 sen less per unit is not a saving if it costs you a reorder.

Ready to Place a Custom Bag Order Without the Guesswork?
Most bulk printing mistakes are preventable if you know what to check and when. Use the checklists in this guide before every order: confirm your CMYK values, check all six proof elements, and request a physical sample for any order above 1,000 pieces or with colour-critical artwork.
Viazan Print's pre-production process is built around catching errors before they reach bulk. From non-woven bags to laminated options, woven vs non-woven comparisons, and guidance on reusable bag packaging for your business, our blog covers the decisions that matter before you place your order.
Not ready to order yet? Browse our full range of custom bags, including non-woven, paper, canvas, nylon, and PP. You can also explore trending promotional bag ideas to find the right product for your business.
FAQ
What is the difference between a digital proof and a physical sample for custom packaging in Malaysia?
A digital proof is a flat visual file that shows how your artwork will be laid out on the bag. A physical sample is an actual printed bag produced on your specified material and GSM before bulk production begins.
The proof confirms design placement; the sample confirms how the real product looks, feels, and performs under load.
What are the risks of printing custom bags without requesting a physical sample first?
Without a physical sample, you have no way to verify ink colour on the actual substrate, GSM feel, or handle durability before 1,000 or more units are produced. If the bulk batch does not meet your expectations, the entire order must be restarted at full cost and with the full lead time.
For colour-critical or high-volume orders, skipping the sample is one of the most common and costly mistakes in custom packaging.
Why do printed colours look different from what I see on my screen?
Screens produce colour using RGB light, which can display a wider range of vivid tones than commercial printing inks can reproduce. Print uses CMYK ink, which has a narrower colour gamut, so bright or neon tones in particular will appear more muted on the finished bag.
Providing a Pantone reference code instead of a screen colour is the most reliable way to ensure you receive the exact colour you see.
How do I check quality before bulk printing begins?
Request a physical sample and review it against three criteria: colour accuracy on the actual material, ink adhesion when rubbed, and handle strength under the heaviest load the bag will carry. Compare the sample against your approved digital proof for positioning and spelling.
Only release bulk production once you have signed off on the sample in writing.
What file format should I submit to avoid print-quality issues?
Vector files in AI or EPS format are the preferred standard for commercial bag printing because they scale to any size without losing sharpness. If you only have a raster file, such as a JPEG or PNG, it must be at least 300 dpi at the final print size.
Submitting a low-resolution file is the most common reason artwork fails the pre-production check and delays proof production.
Does Viazan Print offer custom packaging samples before bulk production in Malaysia?
Yes. Viazan Print produces a physical golden sample for buyer approval before any bulk order goes into production. The sample is printed on your specified material and GSM, reviewed by the production team for artwork alignment, ink curing, and handle quality, and then dispatched for your sign-off.
Bulk production begins only after you confirm the sample meets your requirements.